One of the very first tasks a developer faces when working on a new idea, after picking a base tech stack, is to add some form of user authentication. Most apps, after all, have some concept of a “who” at the core of the domain.
Choosing EdgeDB to build your application’s data layer, you quickly discover that all of the usual ceremony around shaping your data, transforming it into your application domain, and properly serializing it becomes a much more simple, even enjoyable enterprise. So much logic and linking become a part of your database schema and querying that, on the outside, your application code can now be much more focused on the specifics of your business logic and problem domain.
One of those features that just makes EdgeDB querying feel so effortless compared to traditional approaches to building with relational or document-based databases is our access policies. They are a powerful tool that lets you move a lot of filtering and access control directly into the database. That not only simplifies your application code, it also becomes a backstop for safety, helping you to avoid accidental data leaks.
Let’s look at a small part of an imaginary Next.js application. Notice how much of the business logic lives in the database itself, making the actual application code a very thin wrapper mostly concerned with (de)serializing, handling the database connection, and shaping the data in a way that is appropriate for the caller in a single highly optimized query using EdgeDB’s query language, EdgeQL.
module default {
    global currentUserId: uuid;

    scalar type ShipmentStatus extending enum<
        'Pending', 'Shipped', 'Delivered'
    >;
    scalar type OrderStatus extending enum<
        'Pending', 'PartiallyShipped', 'Shipped', 'Complete'
    >;

    type User {
        required name: str;
    }

    type Shipment {
        required status: ShipmentStatus;
        required order: Order;
    }

    type Order {
        required createdAt: datetime;
        required orderedBy: User;

        shipments := .<order[is Shipment];
        status := OrderStatus {
            using (
                if all(.shipments.status = 'Delivered')
                then OrderStatus.Complete
                else (
                    if all(.shipment.status = 'Shipped')
                    then OrderStatus.Shipped
                    else (
                        if any(.shipment.status = 'Shipped')
                        then OrderStatus.PartiallyShipped
                        else OrderStatus.Pending
                    )
                )
            )
        }

        access policy ordered_by_has_full_access
            allow all using (
                .orderedBy.id ?= global currentUserId
            );
    }
}import { createClient } from "edgedb";
export { default as e } from "@/dbschema/edgeql-js";
export const client = createClient();"use server";
import { redirect } from "next/navigation";
import { e, client } from "@/edgedb";
export async function getOrdersWithStatus({
limit = 10,
offset = 0,
}: {
limit?: number;
offset?: number;
}) {
declare const currentUserId: string | null;
if (!currentUserId) {
redirect("/");
}
const authenticatedClient = client.withGlobals({ currentUserId });
return await e
.select(e.Order, (order) => ({
id: true,
status: true,
limit,
offset,
}))
.run(authenticatedClient);
}The schema here describes a simplified order taking application that has a
User type, an Order type, and a Shipment type. Orders have
many Shipments and Orders are associated with the User that
placed the Order through an orderedBy link. Furthermore, we are
restricting access using an access policy. Only the User who placed the
Order has any access to this object.
We are then creating an EdgeDB Client object, and using that object in a
Next.js Server Action to get a paginated list of Order objects associated
with the requesting User along with the computed orderStatus.
Drawing the rest of the owl

You will no doubt notice that the currentUserId is being declared out of
thin air here. But this is the essence of authentication, answering the question
“Who is this user?” In the past, your options for integrating authentication
have been to either roll your own, use a hosted service such as Clerk or Auth0,
or set up an adapter-based solution like Auth.js. When we set out to build an
authentication solution for EdgeDB, we wanted to build the most seamless and
easy-to-integrate solution possible. That focus lead us to choose a deeply
integrated strategy that includes everything you need right inside of the EdgeDB
server itself.
All you need to do to set up EdgeDB Auth with Next.js is configure a few important details using our built-in UI, use our helper libraries to easily implement the few HTTP endpoints necessary for authentication, and you now have a fully authenticated client instance to run your queries with. Let’s have a quick tour of doing exactly that.
Configuring the auth extension
EdgeDB Auth is configured in the same manner as the rest of your EdgeDB system: using the built-in configuration system. That means you can script the configuration with your favorite infrastructure tools, write custom scripts, or change configuration right from the EdgeDB REPL. However, the best and easiest way to configure EdgeDB Auth is using our new UI.
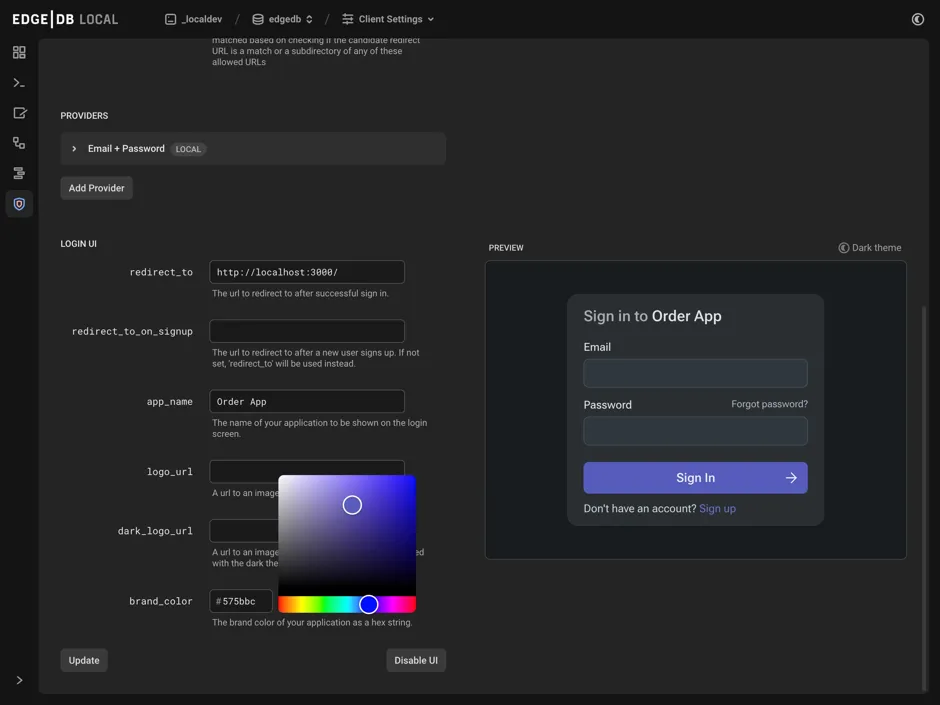
There are a few important values to set up here, and some URLs that you might need if you plan on using OAuth or our built-in UI. See our Auth Guide for detailed information on how to configure each part. The UI even shows you a preview of the what the built-in UI will look like with various providers. Here we’ve configured the Email and Password provider, and are now customizing the built-in UI to match our brand colors.
An authenticated client, the easy way
Once your user completes an authentication flow, whether with email and password
or with one of the social identity providers, we attach an HttpOnly cookie that
carries a token provided by EdgeDB. Our Next.js helper library then uses that
cookie to create an authenticated client. You don’t have to worry about all of
the plumbing.
using extension auth;

module default {
    global currentUserId: uuid;
    global currentUser := (
        select User
        filter .identity ?= global ext::auth::ClientTokenIdentity
    );

    scalar type ShipmentStatus extending enum<
        'Pending', 'Shipped', 'Delivered'
    >;
    scalar type OrderStatus extending enum<
        'Pending', 'PartiallyShipped', 'Shipped', 'Complete'
    >;

    type User {
        required name: str;
        required identity: ext::auth::Identity;
    }

    type Shipment {
        required status: ShipmentStatus;
        required order: Order;
    }

    type Order {
        required createdAt: datetime;
        required orderedBy: User;

        shipments := .<order[is Shipment];
        status := OrderStatus {
            using (
                if all(.shipments.status = 'Delivered')
                then OrderStatus.Complete
                else (
                    if all(.shipment.status = 'Shipped')
                    then OrderStatus.Shipped
                    else (
                        if any(.shipment.status = 'Shipped')
                        then OrderStatus.PartiallyShipped
                        else OrderStatus.Pending
                    )
                )
            )
        }

        access policy ordered_by_has_full_access
            allow all using (
                 .orderedBy.id ?= global currentUserId
                 .orderedBy ?= global currentUser
            );
        }
}import { createClient } from "edgedb";
import createAuth from "@edgedb/auth-nextjs/app";
export { default as e } from "@/dbschema/edgeql-js";
export const client = createClient();
export const auth = createAuth(client, {
baseUrl: "http://localhost:3000",
});import { redirect } from "next/navigation";
import { client, auth } from "@/edgedb";
import e from "@/dbschema/edgeql-js";
export const { GET, POST } = auth.createAuthRouteHandlers({
async onBuiltinUICallback({ error, tokenData, isSignUp }) {
if (isSignUp) {
await e.insert(e.User, {
name: "",
identity: e.assert_exists(
e.select(e.ext.auth.Identity, (identity) => ({
filter_single: { id: tokenData.identity_id },
}))
),
});
redirect("/onboarding");
}
redirect("/");
},
onSignout() {
redirect("/");
},
});"use server";
import { redirect } from "next/server";
import { e, client } from "@/edgedb";
import { e, auth } from "@/edgedb";
export async function getOrdersWithStatus({
limit = 10,
offset = 0,
}: {
limit?: number;
offset?: number;
}) {
declare const currentUserId: string | null;
const session = auth.getSession();
if (!currentUserId) {
if (!(await session.isSignedIn())) {
redirect("/");
}
const authenticatedClient = client.withGlobals({ currentUserId });
const authenticatedClient = session.client;
return await e
.select(e.Order, (order) => ({
id: true,
status: true,
limit,
offset,
}))
.run(authenticatedClient);
}Now let’s walk through the few small changes here:
In the schema, we enabled the auth extension, and created a computed global
that links to whatever User object happens to link to the
ext::auth::ClientTokenIdentity global that is defined in the EdgeDB Auth
extension. This extension global is the secret sauce that ties together the
authentication token issued by the EdgeDB Auth extension and your own
application data.
In the database configuration module, we set up the EdgeDB Auth Next.js helper
library by passing in the plain unauthenticated client, and export the resulting
auth object for use elsewhere in the app.
EdgeDB Auth uses Proof Key of Code Exchange, or PKCE, to securely communicate the auth token from the EdgeDB Auth server back to the application. In order for that exchange to work, there are a few endpoints that need to be set up. Luckily, we provide an easy way to set these up, and provide a convenient way to hook into the authentication lifecycle.
In the new route handler module, we’re setting up a redirect back to the root of
the application when the built-in UI authentication is completed. It is called
with any errors that might have occured. It also can signal to the application
if you’re signing up for the first time, or a returning user. For new users, we
create a new User object linked to the newly created ext::auth::Identity
and redirect them through a special onboarding flow.
And finally, in our server action, we can now use the auth object we
exported above and get our authenticated client, assuming the user is logged in.
Easy enough!
Why choose EdgeDB Auth?
Among the alternatives are some well-loved and excellent services and libraries. We’ve taken a lot of inspiration from these excellent products. However, there are some very clear wins with using EdgeDB Auth, even in this early state where it is outclassed in areas like “number of providers” and “number of authentication strategies”. If you are looking for a simple yet robust authentication solution to use right now to get your ideas off the ground, here are some reasons why you should try out EdgeDB Auth over the other options:
Built-in UI
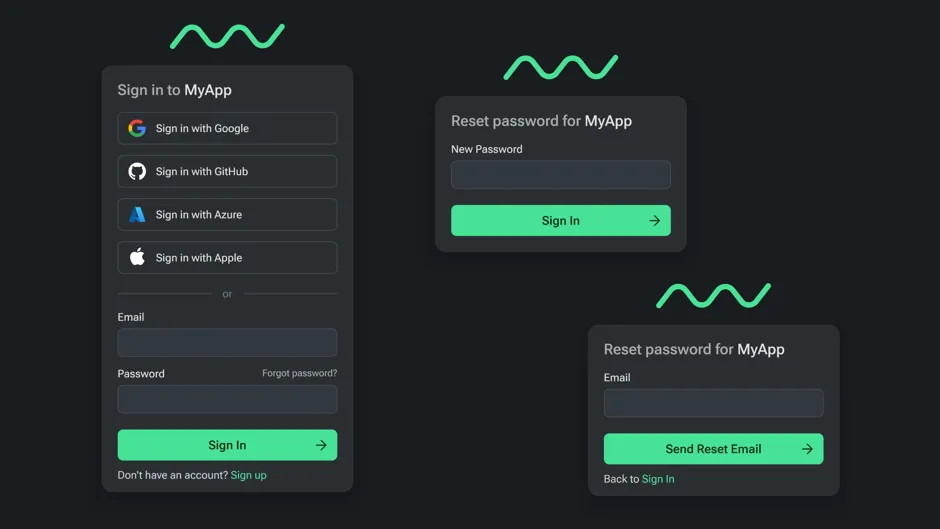
Enable the built-in authentication UI to get maximum speed. Not only do we take care of the plumbing, we built you a nice little starter home that you can enjoy while you focus on what makes your idea truly worth building. Later, once you’re ready to build your own UI, you can pack up and move into your own shiny custom UI with the perfect matching design.
Deeply integrated
This might not seem like a huge deal, but it goes along with our ethos of treating development as a first-class citizen. Every EdgeDB server comes with the auth server, and it is configured and deployed the same way in development as it is in production.
Much like other solutions such as the fantasic NextAuth/Auth.js library, your authentication data lives directly along side your application data. This eliminates latency, reduces the distributed complexity of your application, and simplifies the operational overhead: deploying EdgeDB means you deploy EdgeDB Auth. Simple.
However, since EdgeDB Auth is shipped as an extension, unlike Auth.js, there is
no need to add noise to your schema related to Auth and configure adapters:
everything is initialized for you with just using extension auth;.
And this is just the beginning
At present, EdgeDB Auth is a dependable, if somewhat simple, authentication platform that comes as a complete solution for most applications. But, we’re not stopping here! The near-future looks bright: multi-factor authentication; passwordless authentication such as email-based magic links and WebAuthn; more integrations with social providers and third-party authentication solutions. Also, built-in auditing, more integrations with our world-class database UI, and custom email templates. We have a lot of ideas, and we can’t wait to bring more features and capabilities to EdgeDB Auth over the coming releases.
Come join us on Discord and share with us your experiences building with EdgeDB Auth, and help us shape its future.