Nuxt 3’s emphasis on providing a similar developer experience on both the frontend and the backend parts of your project makes it an excellent pair with EdgeDB.
-
EdgeDB’s
dbschema/directory looks in line with Nuxt’s filesystem-based developer experience -
Nuxt auto-imports are a match made in heaven for EdgeDB’s generation features like its query generators, query builder, and TypeScript interfaces.
-
Since it handles database schema, migrations and authentication, adding EdgeDB almost turns Nuxt 3 into a Laravel-like framework, but fully built around TypeScript.
-
EdgeDB UI feels right at home in the Nuxt DevTools UI. You might not even believe they’re two different tools!
-
Not being locked to third-party hosting is a key point for Nuxt. With EdgeDB, you can safely self host or move faster by hosting with EdgeDB Cloud. Not being locked into a particular vendor guarantees you remain the captain of your ship!
nuxt-edgedb embraces both technologies to make your development
experience a more rewarding one.
A new layer for your Nuxt project
Let’s add a database to your project and showcase how every EdgeDB feature feels like it was built specifically with Nuxt in mind.
Add the nuxt-edgedb module to your project:
$
pnpm add nuxt-edgedb-moduleConfigure it in your nuxt.config file:
// nuxt.config.ts

export default defineNuxtConfig({
  modules: [
    'nuxt-edgedb-module'
  ],
  // Toggle `auth` and/or `oauth` depending on your needs
  edgeDb: {
    auth: true,
    oauth: true,
  },
  // Enable the devtools; we will need them later 😊
  devtools: { enabled: true },
})
Learn more about the module options in the nuxt-edgedb readme.
Write your first schema in dbschema/default.esdl:
module default {
  type BlogPost {
    content: str {
      default := 'My new blog post.';
    };
    description: str {
      default := 'My blog post description.';
    };
    title: str {
      default := 'My blog post title.';
    };
  }
}
You can find default templates in nuxt-edgedb's playground directory.
The next time you run nuxt dev, the module will automatically detect your
environment and prompt you with the steps to get your project running. It will
prompt you to setup EdgeDB’s CLI if
you do not already have it. It will also run your migrations and generate your
queries and query builder.
Maybe that won’t be useful to you on the first run, but think of the pain it used to be to share a database layer with your coworkers. Now getting your full database layer running from scratch locally is as easy as running your Nuxt project. 🚀
A database for your server/ directory
Now that you’ve added a database to your Nuxt project, let’s see how you can use it in your server/ directory.
The module will auto-import three functions: useEdgeDb,
useEdgeDbQueries, and useEdgeDbQueryBuilder.
Calling useEdgeDb returns the EdgeDB TypeScript client with proper typings.
// server/api/blogpost/[id].ts
import { defineEventHandler, getRouterParams } from 'h3'

export default defineEventHandler(async (req) => {
  const params = getRouterParams(req)
  const id = params.id
  const client = useEdgeDb()

  const blogpost = await client.querySingle(`
    select BlogPost {
      title,
      description
    } filter .id = ${id}
  `)

  return blogpost
})
The useEdgeDbQueries
function will return an object containing TypeScript query functions generated
from any .edgeql files in dbschema/queries.
The client will be passed to these queries automatically. You only need to pass them properly typed arguments.
// queries/getBlogPost.edgeql
select BlogPost {
  title,
  description
} filter .id = <uuid>$blogpost_id// server/api/blogpost/[id].ts
import { defineEventHandler, getRouterParams } from 'h3'
export default defineEventHandler(async (req) => {
// Get parameters
const { id } = getRouterParams(req)
// Query blogpost
const { getBlogpPost } = useEdgeDbQueries()
const blogPost = await getBlogpost({ blogpost_id: id })
return blogpost
})useEdgeDbQueryBuilder exposes the EdgeDB query builder with proper typings.
// server/api/blogpost/[id].ts
import { defineEventHandler, getRouterParams } from 'h3'

export default defineEventHandler(async (req) => {
  const params = getRouterParams(req)
  const id = params.id
  const client = useEdgeDb()
  const e = useEdgeDbQueryBuilder()

  const blogPostQuery = e.select(
    e.BlogPost,
    (blogPost) => ({
      id: true,
      title: true,
      description: true,
      filter_single: { id }
    })
  )

  const blogPost = await blogPostQuery.run(client)

  return blogpost
})
Learn how to use the query builder in the EdgeDB query builder documentation.
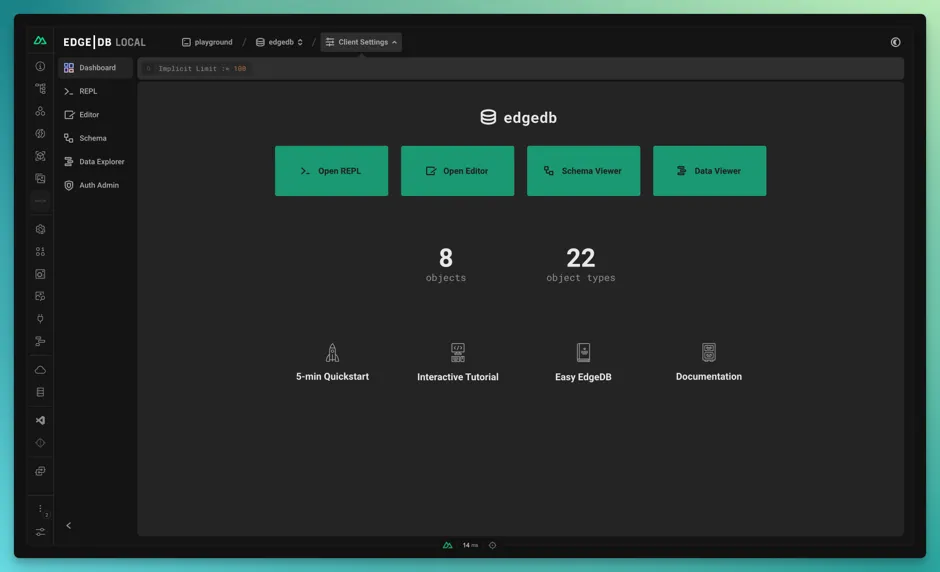
A database that fits in your DevTools
Nuxt recently released Nuxt DevTools, pushing forward the level of developer experience module authors can provide. It’s the perfect place to inject the EdgeDB UI.
This is what the EdgeDB tab looks like inside Nuxt DevTools:
An authentication layer that scales with you
At this point, we’ve added a strongly typed database layer to your Nuxt project, but what if we also want to authenticate your users?
EdgeDB offers a batteries-included auth
solution and
nuxt-edgedb will bridge the last gap to integrate it inside Nuxt.
Enable the authentication feature in your nuxt.config:
export default defineNuxtConfig({
  modules: ['nuxt-edgedb-module'],
  edgedb: {
    // Enables email/password auth
    auth: true,
    // Enables oauth providers
    oauth: true
  }
})
Enable the auth extension inside your dbschema/default.esdl schema:
using extension auth;

module default {
  global current_user := (
    assert_single((
      select User { id, name }
      filter .identity = global ext::auth::ClientTokenIdentity
    ))
  );

  type User {
    required name: str;
    required identity: ext::auth::Identity;
  }

  type BlogPost {
    property content: str {
      default := 'My blog post content.';
    };
    property title: str {
      default := 'My blog post';
    };
    required author: User;

    access policy author_has_full_access
      allow all
      using (.author ?= global current_user);

    access policy others_read_only
      allow select;
  }
}
Refer to the official EdgeDB Auth examples for more examples of integrating the extension.
Don’t forget to run edgedb migration create and edgedb migrate to lock
in those schema changes and complete activation of the extension.
Now, you may use EdgeDBAuth components on the client:
<template>
  <EdgeDbAuthEmailLogin
    v-slot="{ email, updateEmail, password, updatePassword, submit, loading }"
    redirect-to="/"
  >
    <div>
      <input
        type="email"
        :value="email"
        placeholder="your@email.com"
        @change="(e) => updateEmail(e.target.value)"
      >
      <input
        type="password"
        :value="password"
        placeholder="password"
        @change="(e) => updatePassword(e.target.value)"
      >
      <button
        type="button"
        @click="(e) => !loading && submit()"
      >
        {{ loading ? 'Loading' : 'Login' }}
      </button>
    </div>
  </EdgeDbAuthEmailLogin>
</template>
Looking for OAuth implementation? Visit the nuxt-edgedb readme.
Once logged in, the cookie will be set on the client and authentication to the database can be easily be made by passing the request to your composables.
export default defineEventHandler(async (req) => {
  // 🚫 Will throw an error
  // You cannot delete a BlogPost w/o being the author
  const { deleteBlogPost } = useEdgeDbQueries()
  await deleteBlogPost({ blogpost_id: id })

  // ✅ Success
  const {
   deleteBlogPost: deleteBlogPostAuthenticated
  } = useEdgeDbQueries(req)
  await deleteBlogPostAuthenticated({ blogpost_id: id })

  return { id }
})
On the client side, you can check the session using useEdgeDbIdentity:
<script setup lang="ts">
const { isLoggedIn } = useEdgeDbIdentity()
</script>

<template>
  <div>
    <LoginButton v-if="isLoggedIn" />
    <LogoutButton v-else />
  </div>
</template>
Want to learn more about EdgeDB Auth? Visit the documentation page.
Pushing to production
Now that you have added a full-featured database to your project, you might be ready to push it to production.
EdgeDB offers their EdgeDB Cloud platform that’s easy to use and deploy too, or you can opt to self-host on your server.
Specify your ENV variables pointing to your production server:
NUXT_EDGEDB_HOST=
NUXT_EDGEDB_PORT=
NUXT_EDGEDB_USER=
NUXT_EDGEDB_PASS=
NUXT_EDGEDB_DATABASE=
Don’t forget to run your migrations on your production instance via
edgedb migrate, specifying any connection options you need to connect
to that instance.
A working example project
Now that you’ve seen how everything works, why not check out a complete
example? You can find one in the module repository, in the playground
directory.
In pages/auth you can see how every authentication features gets implemented.
Looking at server/api/blogpost will help you understand how database querying and authenticating work.
If you have questions, feel free to ask them in the nuxt-edgedb module issues.
You’re just getting started!
With nuxt-edgedb, you just unlocked a whole new world of possibilities for
your Nuxt project!
The module readme also has a Q&A section that answers the most frequently asked questions. We can’t wait to see what you build with Nuxt and EdgeDB!